Student Info Tab

-
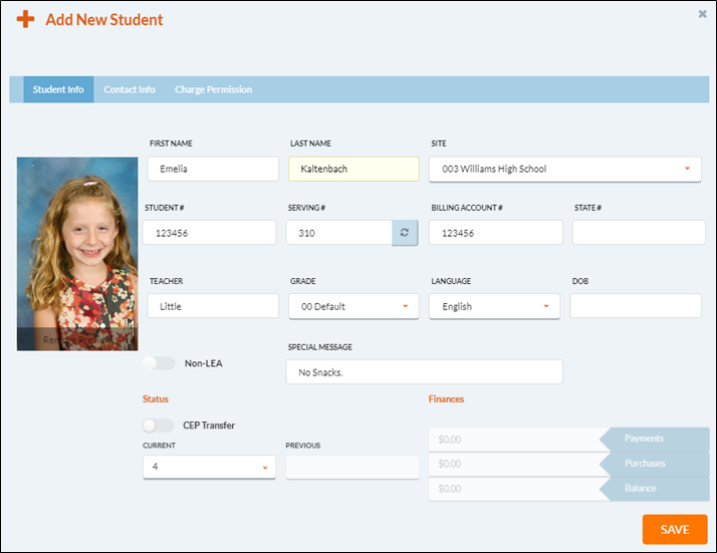
Enter the student’s First Name and Last Name in the appropriate fields (up to 20 characters each).
-
Select the student’s assigned school from the Site dropdown list, if not already selected from the Account Setup form.
-
A valid school number is required for each student or adult account.
-
-
Enter the Student # in the Student # field. This must be unique within the district.
-
If you get a message that it has already been used, you will need to assign a different number.
-
-
Enter the serving # in the Serving # field.
-
Serving # can be the same as Student # or user can assign something different.
-
If you want the system to assign a Serving #, click the
 button.
-
-
The Billing Account # is the billing number for the account and will automatically populate based on the Student # but can be changed.
-
This can be the same as the Student #, or users can set up special billing accounts for catering or families where students at the same school can share payments.
-
-
Enter a state Id in the State # field. This is optional.
-
This is currently being used for the New York SIRS Export.
-
-
Enter the student’s teacher name in the Teacher field. This is optional.
-
Unique teacher names within the district are recommended. You can include first name, initial, etc., if there are duplicate teacher names.
-
-
Select the grade from the Grade dropdown list. This defaults to 00 if nothing is selected.
-
Select the language the student prefers from the Language dropdown list.
- The default language is English.
-
The language selected here will be used for printed receipts and student account letters.
-
Enter the student’s Date of Birth in the DOB field. This is optional.
-
Select the Non-LEA toggle to the right if the person being entered is a not related to the Local Education Agency (LEA).
-
This is currently being used for the New York SIRS Export.
-
-
Enter and save special messages for students in the Special Message field. This is optional.
-
This allows up to 50 characters and will display for the cashier when the student is being served.
-
- The CEP Transfer toggle is for students that are transferring from a CEP School to a non-CEP School.
- NOTE: Once the student has been added, users can set a Grace Period on the Application Screen for when the new status will be implemented.
Status: Current
This shows the current status for this account.
-
Numeric status codes are used for confidentiality. The status codes used in Meals Plus Web are:
-
2 = Free Student
- 3 = Reduced Student
- 4 = Paying Student
- 5 = Withdrawn Student
- 6 = Teacher
- 7 = Adult
- 8 = School Food Service Employee
- 9 = Catered
-
Status: Previous
This updates automatically whenever a status is changed.
FINANCES
Payments
This is a running total of all payments for this account. You must have security rights to Allow Changing Balance (under Administration: System Settings: User Role Access: Students: Account Setup: Preferences) to make changes here.
Changes made here will NOT show on Daily Deposit.
Purchases
This is a running total of all purchases for this account. You must have security rights to Allow Changing Balance (under Administration: System Settings: User Role Access: Students: Account Setup: Preferences) to make changes here.
Changes made here will NOT show on Daily Deposit.
Balance
This displays the account balance based on the transactions entered for this account.
STUDENT PICTURE
The drag and drop frame is where you can attach a picture to a student’s accounts. It will show on the serving screen. Pictures can be jpg or bitmap format. The maximum file size is 100kb.

-
Drag the Image file from Windows Explorer or your computer’s desktop into this box, or double-click in this box to be able to select a file.
-
Browse to the location of your import file, highlight the file so it is in the File Name field, and click the Open button.
- Click the Save button when complete.


